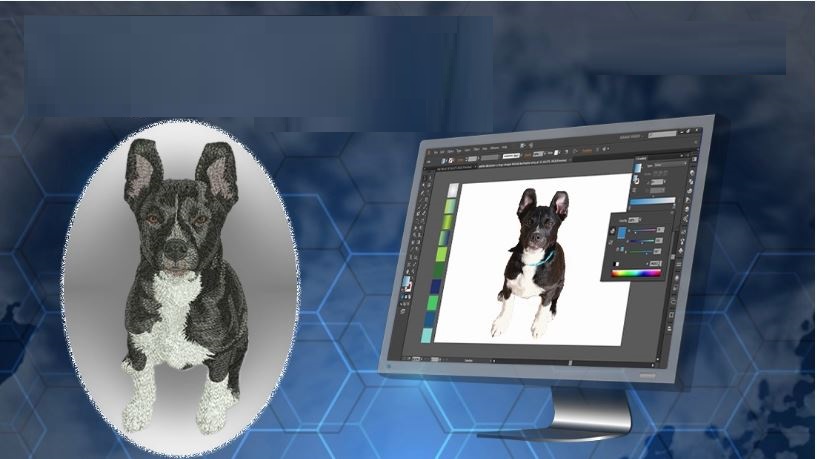
A dog photo can make a lovely embroidery design. But turning a photo into stitches takes more than adding the image to embroidery software. Fur, eyes, ears, noses, and small face marks all need careful planning. The goal is to keep the dog’s look while making the design easy for the machine to stitch.
If you want to Digitize Dog Designs for Embroidery, start with a clear photo and a good plan. A skilled digitizer studies the dog’s face, fur, shape, and key marks before making the stitch file. Stitch type, density, underlay, stitch direction, and color order all matter. Good planning helps the design keep its shape and detail while reducing thread breaks, gaps, and puckering.
Why Dog Photos Can Be Hard to Digitize
Dog photos often have many small details.
Fur can have many shades. Eyes can be tiny. A nose may have soft edges. The face may also have light and dark areas that do not work well as direct stitch shapes.
Embroidery also uses thread instead of pixels. This means the photo must be simplified.
A good digitizer asks:
- Which details are most important?
- Which parts can be removed?
- Which colors should stay?
- What stitch type should each area use?
- How large will the final design be?
- What fabric will hold the stitches?
These choices can make a big difference.
Start With a Clear Dog Photo
The source photo is the first step.
A clear image gives the digitizer more information. A blurry photo can make it hard to see the dog’s eyes, nose, ears, and fur pattern.
What Makes a Good Photo?
Try to use a photo with:
- Good light
- A clear face
- Sharp eyes
- Visible ears
- Good contrast
- Little background clutter
A front or side view can work well. The best view depends on the design you want.
Remove a Busy Background
The dog should be the main focus.
A busy background can add shapes that are not needed. Removing it makes the design easier to plan.
The digitizer can then focus on the face, body, fur, and other key parts.
Plan the Final Embroidery Size
Size matters a lot.
A large dog portrait can show more detail than a small chest logo. When the design gets smaller, tiny details may disappear.
Before digitizing, decide where the design will go.
It may be used on:
- Shirts
- Jackets
- Hoodies
- Caps
- Bags
- Blankets
- Pet items
- Gifts
Tell the digitizer the final size before work starts.
Keep the Dog’s Main Features
A good pet design does not need every hair.
It needs the details that make the dog look like itself.
Focus on the Eyes
The eyes are often one of the most important parts.
Small changes in eye shape or placement can change the look of the face. The eyes should have enough stitch detail to stay clear.
Keep the Nose and Mouth Clear
The nose and mouth help show the dog’s expression.
Too many stitches can make these areas heavy. Too few may remove important shape.
Simple, well-planned stitches often give better results.
Show the Ear Shape
Ears can help identify a dog.
Their size, angle, and shape should be kept clear. Large areas may use fill stitches, while smaller edges may need satin or running stitches.
Choose the Right Stitch Types
Different parts of a dog design may need different stitches.
Fill Stitches for Large Areas
Fill stitches work well for larger areas of fur and body shape.
The stitch direction can change to create a smooth look.
Satin Stitches for Narrow Areas
Satin stitches can work well for some edges, outlines, and small shapes.
They can give a smooth and clean finish when used at the right width.
Running Stitches for Fine Lines
Running stitches can help with thin lines and small marks.
They should be used with care. Very fine lines may not show well after stitching.
Use Layers to Build the Design
A dog portrait can be built in layers.
A digitizer may first create the main shape. More detail can then be added on top.
This can include:
- Main body or face shape
- Large color areas
- Fur details
- Eyes and nose
- Small highlights
- Final outlines or accents
The order depends on the design.
A good stitch order can help the parts line up and reduce extra machine movement.
Get the Stitch Density Right
Density is the amount of space between stitches.
Too many stitches can make a dog design thick and hard. It may also cause thread breaks and puckering.
Too few stitches can leave gaps.
The right density depends on:
- Fabric
- Design size
- Thread
- Stitch type
- Design detail
A good digitizer balances these factors.
Avoid Heavy Fur
Fur can tempt people to add too many stitches.
But more stitches do not always mean more detail.
Too much thread can hide the shapes that make the dog look real. A lighter stitch plan can often create a cleaner result.
Use Underlay for Better Support
Underlay is placed below the main stitches.
It can help support the fabric and top stitches.
Good underlay may improve:
- Stability
- Shape
- Coverage
- Stitch quality
- Detail
The amount needed depends on the fabric and design.
Too much can make the design stiff. Too little may not give the top stitches enough support.
Use Stitch Direction to Show Fur
Stitch direction can help create a better look.
Fur does not always grow in one direction. The stitch plan can follow the natural shape of the dog’s body.
For example, the direction may change around:
- The face
- Ears
- Neck
- Chest
- Legs
- Tail
This can give the design more shape without adding too many stitches.
Pick Thread Colors With Care
Dog fur can have many colors.
A brown dog may have light tan, dark brown, black, and cream areas. A white dog may still have many shades.
The goal is not to copy every shade.
Use the Most Useful Colors
Too many thread colors can make a design harder to manage.
Choose colors that show the main shapes and key features.
A small set of well-matched colors can often create a stronger result than a large set of close shades.
Small Details Need Extra Care
Small details can be lost during embroidery.
This is common with:
- Tiny hairs
- Small spots
- Fine whiskers
- Small eye highlights
- Thin mouth lines
If a detail is too small, it may need to be enlarged or removed.
Do Not Force Every Detail Into Thread
This is one of the most useful rules in pet embroidery.
A photo may contain hundreds of tiny details. Thread cannot copy all of them clearly.
A skilled digitizer chooses the details that matter most.
Consider the Fabric
The same dog design may stitch differently on different fabrics.
A soft shirt can behave differently from a thick jacket. A cap can also create special challenges because of its curved shape.
The digitizer should know the fabric before setting the file.
Test on Similar Fabric
A test stitch is very useful.
Try to use material that is close to the final product.
This helps show how the stitches will look in real use.
Test the Design Before Production
Never rely only on the screen preview for an important job.
A test stitch can show issues that are hard to see on a computer.
Look for:
- Thread breaks
- Gaps
- Puckering
- Poor coverage
- Lost details
- Uneven edges
- Weak eyes
- Poor color balance
If something does not look right, make changes before full production.
Choose a Skilled Dog Embroidery Digitizer
Pet embroidery needs more care than a simple logo.
Check Real Samples
Ask to see real pet embroidery work.
Look at the eyes, fur, face shape, and small details.
Good samples should show clear features without looking too heavy.
Ask About Revisions
A test stitch may show that a design needs changes.
Ask if revisions are part of the service. This can help you get the result you need.
Share All Project Details
Give the digitizer:
- Original photo
- Final size
- Fabric type
- Placement
- Machine type
- Hoop size
- Desired file format
More information can help reduce mistakes.
Common Mistakes to Avoid
Using a Poor Photo
A blurry source can limit the final result.
Making the Design Too Small
Tiny dog faces can lose important features.
Using Too Many Stitches
More stitches do not always create more detail.
Using Too Many Colors
Too many close colors can make the design look busy.
Skipping the Test Stitch
A test can find problems before a large order.
How Professional Digitizing Helps
Professional digitizing can save time and help create a stronger final result.
Digitizing Buddy helps prepare embroidery designs with factors such as stitch type, density, fabric, size, and machine use in mind.
Careful digitizing can help turn a favorite dog photo into a design that works on shirts, jackets, caps, bags, blankets, and gifts.
The goal is not to copy every pixel. The goal is to capture the dog’s most important features in stitches.
Simple Dog Embroidery Checklist
Before production, check these points:
- Is the photo clear?
- Is the background clean?
- Is the final size correct?
- Are the eyes clear?
- Is the nose easy to see?
- Are the main fur areas balanced?
- Is stitch density suitable?
- Are the thread colors right?
- Does the file fit the hoop?
- Has the design been test stitched?
Final Thoughts
Dog embroidery is a great way to turn a favorite pet photo into something you can keep for years. But good results start with careful digitizing.
The best designs focus on the dog’s key features. Clear eyes, a strong face shape, good color balance, and well-planned fur can make the design feel more natural.
Stitch type, density, underlay, stitch direction, fabric, and size all need attention. A test stitch can then help find issues before production.
Digitizing Buddy can help with professional pet embroidery file preparation when you need a clean and reliable design. With a clear photo, careful stitch planning, and proper testing, your dog’s unique look can become a sharp and attractive embroidery design.